
discovery - culture - exploration


A Public Service
Our spies have informed us that people arrive at this site on their Quest how to make constructions with a compass.
Well, it's easy - when you know how.
You need a ruler, a pencil or something, a sheet of paper or something; and a compass.
The kind with two points, not the kind to find the North with.
(This caused all the confusion in the first place)
90 degree angle
45 degrees
60 degrees
30 degrees
and how to find the centerpoint of a (round) circle
90 degrees
If you think this means Celsius or (ugh!) Fahrenheit
please go away
.
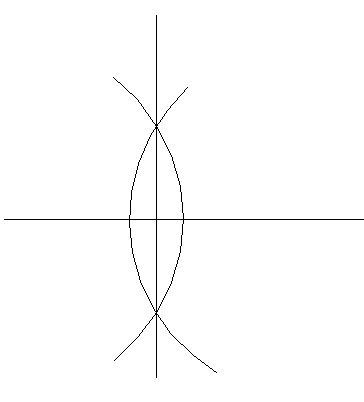
Put the ruler on the paper or something (it doesn't have to be neatly horizontal - it just looks better and so, will result in higher marks) and with the pencil or something, draw a line along the ruler. Take the compass and put the pinpoint somewhere at the end of the line. Now, pay close attention: Draw a circle (or part of it) crossing the line. Watch it: From now on, don't change the "diameter" of the compass! Move your compass to the other end of the line and draw a circle that crosses the first one twice. This is tricky: If the circles don't what we call "intersect", you'll have to move the compass point until they do. Now, you take the ruler and pencil again and connect the two circle crossing points. There you are! The two lines now cross at a 90 degree angle.
In this lesson, you've learned how to use a ruler, a compass, a pencil or something and a sheet of paper or something.
You have also learned the neat and amusing trick of constructing a 90 degree angle.
45 degrees
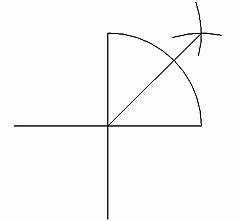
Now that you are more accomplished, it won't be hard to follow these simple instructions:
Take the same sheet of paper. We have erased the circles, but you don't have to do that. From the crossing of the two lines (the "angular point"), draw a quarter circle. Now move the compass to the first of those new crossings and draw another circle; repeat with the same diameter on the second crossing. Draw a line from the 90 degree point to the last circle intersection. Presto! You now have three 90 degree and two 45 degree angles.
60 degrees
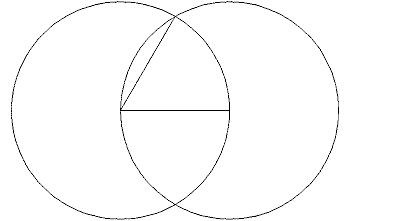
On a new sheet of paper (or turn it over and save a very small tree) draw a line. With the compass point on the endpoint of that line draw a circle with the same radius as the line length. From the other endpoint, where the line crosses the circle, draw a circle with the same diameter. When you draw a line from one line endpoint to one crossing of the two circles, it will form a 60 degree angle with the first line.
If you're really sharp, you may figure out another way where you start out with the compass first and only then use the ruler. Much more efficient!
30 degrees
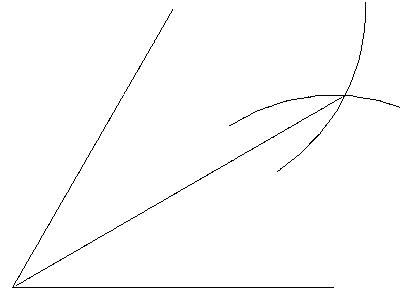
Take heart! We're almost ready. Again, we go on from the preceding drawing. Again, you don't have to erase, but from the two endpoints you draw two intersecting circle segments. From that new crossing, connect with a line to the original 60 degree point, and you will not only have one, but even two 30 degree angles! How's that, huh, gang? See? Math can be fun!
You can repeat this process until you have perforated your entire sheet, but it's not bloody much use constructing a 3.75 degree ("º") angle, is it?
If you find a way to construct a 1º angle, baby, you're a rich person.
But you'll have a hard time convincing those hide-bound conservative mathematicians that you've done so.
Now that you have finished this chapter, you can use the sheet of paper for other purposes; or roll it up and... oops.
This is what we call "recycling" in geometry parlance.
The centerpoint of a circle
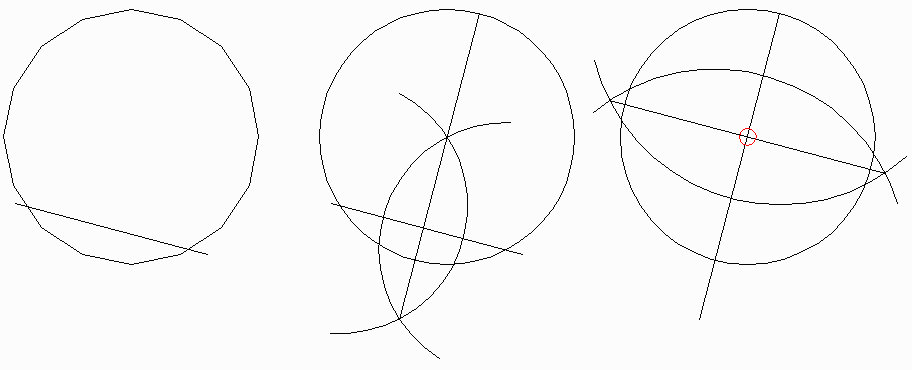
Draw a circle and a line crossing it somewhere. I am not aiming for high marks, so I drew it crooked. (You will notice it is next to impossible to draw a line that crosses the circle only once, but don't think this makes you smart: Even the Greeks knew that, and they were pretty ancient.)
Now, put your compass pin on one of the crossings and draw another circle; move it to the other point and, you guessed it? GOOD! draw yet another one with the same "radius". Draw a line between the points where the two new circles cross and make that line cross the first circle. You have now, in one fell swoop, divided that first line in two equal pieces and put a "plumb" line on it, viz., one at a 90º angle.
Now, concentrate on the last line drawn and give it the same treatment. You may not believe this and I'm not going to try to prove it, but at the crossing of the two lines is the centerpoint, midpoint, "center" of the circle - guaranteed. Don't get all confused by that little red circle: it just indicates the center and is not part of the construction.
We made these drawings in AutoCAD, but it's really much easier to do it as described here.
On the other hand, of course... I have to tell ya, that much-touted and expensive program sometimes has a weird way of drawing "circles".

maps
Funny? I'm not so sure...
If you think you're bad at geometry, and your teachers heartily agree with you, have Courage. The same happened to me at that wonderful school where I was brainwashed for three consecutive years, Canisius College of Nijmegen, Holland. And look at me now, giving free geometry lessons on the World Wide Web! The wordresentmenthardly covers my feelings for that school.

Curaçao Island live in real time
SEARCH this site or the Web

copyright notice
all material on this site, except where noted
copyright © by , curaçao
reproduction in any form for any purpose is prohibited
without prior consent in writing